Git & GitHub: An Invitation to Version Control

This blogpost is a slightly expanded conversion of a talk, I gave to the students of CS460/CS660 at NISER, Bhubaneswar, on January 12, 2024. It is a tutorial-style introduction to Git & GitHub, and how to use them for version control. The sections are delineated to be easily navigable. This blogpost / talk is meant for beginners, and assumes no prior knowledge of Git or GitHub. It is also meant to be interactive, so that the readers can follow along and try out the git commands themselves.
Notes
- The original slides are available in the associated GitHub repo for the Coding Club blogs.
- When you encounter a superscripted ## below, hover over it to see the associated text.
Checklist before we begin:
- Ensure GitHub Desktop is installed and you are signed in. For installing it on Windows and macOS, go here. For some flavors of Linux, check here.
- Verify that Visual Studio Code (VS Code) is installed and you are signed in using GitHub. Don’t forget to sign in to the extensions as well (you can check this by looking for any pending notifications on the profile icon).
- Install the GitLens extension in VS Code. You can do this by searching for “GitLens” in the Extensions tab, or by going here.
Table of Contents
- Some Preliminaries
- Managing the
24cs460(clone)repogit initandgit clonegit remote -vgit branch,git checkoutandgit switchgit status,git add,git rm&git restore,git commit&git commit --amendgit push,git log&git showgit pull&git fetch- Creating a Pull Request (PR) & Merging PRs
- Syncing your Local Repo with the Upstream Repo
- Handling Merge Conflicts (&
git diff) git reset- The (almost-)Nuclear Optiongit revert&git stash- The Safer Alternatives.gitignore
- Additional Information
- References
Some Preliminaries
Version Control Systems and why we need them?
- In “Version Control Systems” (VCS), “Version” refers to a specific state of the codebase at a given point in time, and “Control” refers to the ability to manage changes to the codebase’s state over time. VCS are also called Source Control Systems.
- VCS store snapshots of your codebase (\(\equiv\) codebse’s state) at different points in time. Through these snapshots, they let you compare changes to files.
- They also allow you to revert files / entire projects back to any state, thereby preventing you from losing your work, e.g., if you make a mistake in your code or accidentally delete something.
- For CS460, since you’ll be working in groups, VCS will help you collaborate with your group-mates.
What are Git & GitHub?
- Git is a free and open-source distributed VCS, that works via the command line interface, i.e., a CLI tool. You can download and install it from https://git-scm.com/downloads.
- GitHub is a web-based hosting service for version control using Git. There are other similar services, e.g., GitLab, BitBucket, etc. There are also other VCS, e.g., Mercurial, Subversion, etc.
- Tip: Git is a tool, GitHub is a service. You can use Git without GitHub, but not the other way around.
- Tip: Git / GitHub are not automated## backup services. They are not a replacement for Dropbox / Google Drive / OneDrive etc.
- Sidenote: There exists a related set of software called Knowledge Management Systems, e.g., Obsidian, Notion, Confluence, etc.
Git Primer - Some Basic Concepts
- Git is a distributed VCS. This means that every collaborator has a complete working copy## of the entire codebase, including its full history.
- Git stores the codebase in a repository, or repo for short. A repo is a directory that contains all the files and folders of your project, along with a special hidden folder called
.git. - The
.gitfolder contains all the information about the history of your project, including all the snapshots of your codebase, and the changes made to it. - Tip: If you cannot see the
.gitfolder in VS Code, it’s because VS Code hides it by default. You can change this setting in VS Code Preferences (Search for “.git”), but it’s recommended to keep it hidden. - Commits are snapshots of your codebase at a given point in time. Each commit has a unique identifier called a hash, which is a long string of characters.
Git Primer - Some Keywords
- Some labels:
- Local - The computer / server you are working on.
- Remote - A GitHub repo that stores the codebase.
- Origin - A GitHub repo, where you have pushed your codebase to / cloned your codebase from.
- Upstream - A repo on GitHub that you have forked to your GitHub account.
- Branch - A parallel version of your codebase. You can have multiple branches, e.g.,
main,dev,feature-1, etc. - Forking - Creating a copy of a repo on GitHub, under your GitHub account.
- Pull / Merge Requests - A request to merge a branch into another branch. This is how you collaborate with others on GitHub.
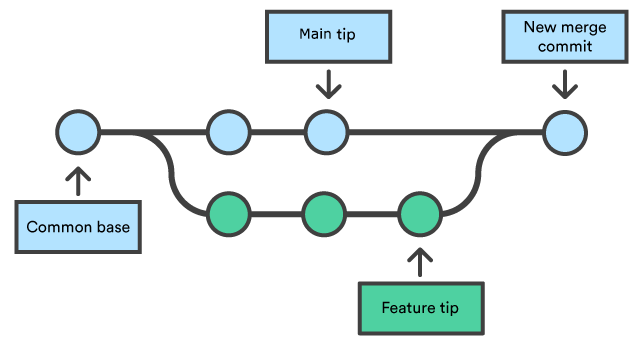
Branching & Merging Illustrated
Managing the 24cs460(clone) repo
- We will work with a duplicate of the original repo. Go to https://github.com/JeS24/24cs460clone.
- Fork the repo to your GitHub account. Click on the Fork button on the top-right corner of the page. This creates a copy of the repo under your GitHub account.
- Clone the repo to your computer by clicking on the Code button, and then copying the URL. Check next section for further steps.
- Make some changes to the repo (check next sections).
- Commit the changes to your local repo (check next sections).
- Push the changes to your GitHub repo (check next sections).
- Create a pull request to merge your changes into the main repo (check next sections).
- Watch the pull request get merged (check next sections).
- Sync your local repo with the upstream repo (check next sections).
- Handle merge conflicts (check next sections).
git init and git clone
- After copying the link, to clone an existing repo, you can use the
git clone <remote>command. This creates a new repo in the current directory, and downloads the codebase from the remote repo.git clone https://github.com/<GH_USER_NAME>/24cs460clone.git - OPTIONAL: To create a new repo, you can use the
git initcommand. This creates a new repo in the current directory. - Tip: To push an existing codebase to GitHub, see: https://www.digitalocean.com/community/tutorials/how-to-push-an-existing-project-to-github.
- Tip: You can also create a new repo on GitHub, and then clone it to your computer. See the instructions given by GitHub after creating a new empty repo.
git remote -v
git remote -vshows you the remote URLs of your repo.git remote show <name>shows you information about the remote with the given name.- OPTIONAL:
git remote add / rm <name> <url>adds / removes a new remote to your repo, with the given name and URL.git remote set-url <name> <url>changes the URL of the remote with the given name.git remote prune <name>removes all the remote-tracking branches that no longer exist on the remote with the given name.
git branch, git checkout and git switch
git branchshows you the branches in your repo.git branch <name>creates a new branch with the given name.git checkout <name>/git switch <name>switches to the branch with the given name.git checkout -b <name>/git switch -c <name>creates a new branch with the given name, and switches to it.git checkout <commit-hash>/git switch <commit-hash>switches to the commit with the given hash.- Tip: It is recommened to use
git switchovergit checkoutfor switching / creating branches. - Tip: Branch names should be kept short, e.g.,
main,dev,feature-1, etc.
git status, git add, git rm & git restore,
- Make a change to the repo, e.g., add a new file, modify an existing file, etc.
git statusshows you the status of your repo, including the files in the staging area##, and the files in the working directory##.git add -A\(\equiv\)git add *adds all modified files in the repo to the staging area.git add <file>adds the given file to the staging area.git rm --cached <file>removes the given file from the staging area, but keeps it in the working directory.git rm <file>/git rm -r <folder>removes the given file / folder from the working directory (if there are no modifications).git restore <path>undoes changes to files in the working directory.
git commit & git commit --amend
git commit -m "<message>"commits## the changes in the staging area to the local repo, with the given message. It does not affect the remote repo (till we push).git commit -a -m "<message>"stages (“adds”) & commits all the changes to the local repo, with the given message.- Tip: Commit messages should be short, yet precise e.g., “Add README.md”, “Fix typo in README.md”, etc.
- OPTIONAL:
git commit --amendlets you amend the last commit, i.e., change the commit message, add / remove files from the commit, etc.git commit --amend --no-editlets you amend the last commit, without changing the commit message.
- Tip: Always try to split changes into smaller updates / commits. More snapshots is almost always a good idea. There are ways to rewrite the history of the repo, if the need arises.
- Tip: If, for some reason, you cannot avoid a large commit, you should write a descriptive message.
git push, git log & git show
git push <remote> <branch>pushes## the changes in the local repo to the remote repo, to the given branch (here,origin&main).git push -u <remote> <branch>sets the given remote repo and branch as the upstream for the current branch. This lets you usegit push(andgit pull) without specifying the remote and branch each time.- OPTIONAL:
git push --forceforces the push to the remote repo. Usually, this should be avoided.git push --delete <remote> <branch>deletes the given branch from the remote repo.
git logshows you the commit history of your repo. It shows each commit, along with its hash, author, date, and message.git log --onelineshows you the commit history in a compact format.git log --graphshows you the commit history in a graphical format.
git show <commit-hash>shows you the changes in the given commit.
git pull & git fetch
git pull <remote> <branch>pulls## the changes from the remote repo to the local repo, from the given branch (here,origin&main).git fetch <remote> <branch>fetches the changes from the remote repo to the local repo, but does not merge the changes into local.- To update your local repo, you should pull the changes from the remote repo, and then merge them into your local repo.
- If there are no merge conflicts##,
git pullwill merge the changes into your local repo, and fast-forward your branch to the latest commit on the remote repo. - Try
git logafter pulling to see the updated commit history. - Tip: You can also see a graphical view of the commit history in VS Code, using the GitLens extension.
- Tip: If you don’t see remote’s changes in local, try
git fetchfirst, and thengit pull.
Creating a Pull Request (PR) & Merging PRs
- Pull requests are a way to collaborate with others on GitHub. Once you have made some changes on a branch on your repo, you can create a PR to merge your changes with another branch, typically the main branch of your repo, or the
mainbranch of another repo, e.g., upstream. - Go to your GitHub repo, and click on the Pull Requests tab.
- Find the branch you want to merge, and click on New pull request.
- Select the base branch, i.e., the branch you want to merge into.
- Select the compare branch, i.e., the branch you want to merge from.
- Click on Create pull request.
- Add a title and a description for the PR.
- Click on Create pull request.
- Wait for the PR to be merged.
- After the PR is merged, check the commit history of your repo, and see the changes (
git logor GitLens).
Syncing your Local Repo with the Upstream Repo
- Tip: Always pull before you push, to avoid merge conflicts on the remote repo.
- To sync:
git fetch upstreamfetches the changes from the remote repo to the local repo, but does not merge the changes into local.git merge upstream/<branch>merges the changes from the remote repo into the local repo, from the given branch (here,upstream&main).git push origin <branch>pushes the changes from the local repo to the remote repo, to the given branch (here,origin&main).
Handling Merge Conflicts (& git diff)
- Merge conflicts occur when changes are made to the same part of the same file on two different branches and Git cannot automatically determine which version to use.
- To see this, let us make a conflicting change to
README.md. - Run
git fetch. git merge upstream/mainto start a merge. It should result in a merge conflict.git statusshows you the files with merge conflicts.git diffshows you the conflicting changes. The conflicting changes are marked with<<<<<<<and>>>>>>>, like so:<<<<<<< HEAD (main) this is conflicted text from main ======= this is conflicted text from feature branch >>>>>>> feature branch- Check the staging area in VS Code to see the conflicting changes. Or, you can use
git diff --stagedto see the changes in the staging area. - Resolve the merge conflict in VS Code by choosing the changes you want to keep, and deleting the rest. VS Code also provides some buttons to help you resolve the conflict, like
Accept Incoming Change,Accept Current Change, etc. - Once resolved, the file will be staged and you can commit and push it.
- Tip:
git merge --abortaborts the merge (before committing), and resets your repo to the state before the merge. This might be useful if you want to start over, e.g., if you made a mistake while resolving the merge conflict.
git reset - The (almost-)Nuclear Option
- Sometimes, you might want to undo a (few) commit(s) or to reset your repo to a previous state, and start over, e.g., if you made a mistake, or if a merge conflict is too complicated to resolve.
git resetlets you reset your repo to a previous state. git reset --hard <commit-hash>resets your repo to the given commit, and deletes (!!) all the commits after it.git reset --soft <commit-hash>resets your repo to the given commit, but keeps (!!) all the commits after it.git reset ~<n>resets your repo to the commit \(n\) commits before the current commit.git reset HEAD~<n>resets your repo to the commit \(n\) commits before the current commit, and unstages all the commits after it.- Tip: Use
git reset --hardwith caution. It is a destructive command, and can result in data loss.
git revert & git stash - The Safer Alternatives
git revertlets you undo a commit, without deleting it.git revert <commit-hash>creates a new commit that undoes the changes in the given commit.- Tip: Use
git revertinstead ofgit reset --hardto undo commits. git stashlets you stash your changes, i.e., save them for later. You can also name your stashes by appending-m "<name>"to the command.- This is useful, when you want to switch branches or pull remote, but you have uncommitted changes in your current branch.
git stash poppops the last stash, i.e., it restores the last stash, and deletes it from the stash list.- When you stash your changes, you can give it a name, e.g.,
git stash push -m "<name>". git stash listshows you the list of stashes.git stash show <stash-name>shows you the changes in the given stash.
.gitignore
.gitignoreis a file that lets you ignore files and folders in your repo. The files and folders in.gitignoreare not tracked by git.- You can use wildcards in
.gitignore, e.g.,*.pyc,*.log,__pycache__, etc. - You can also use negation in
.gitignore, e.g.,!*.py,!*.md, etc. - Tip: You should always add
.gitignoreto the root of your repo, and commit it. - Tip: You can use templates for
.gitignore, e.g., ones provided by GitHub for several languages. - An example of a
.gitignorefor a typical Machine Learning / Deep Learning project in Python:# Folders *.pyc # Logs *.log # Virtual environments venv/ env/ ENV/ # Jupyter Notebooks .ipynb_checkpoints/ # Data data/ *.csv *.tsv *.json *.zip *.tar.gz # Models models/ *.pth *.pt *.ckpt *.h5 # IDEs .vscode/
Additional Information
The following sections contain some additional information, that you might find useful for your future projects.
Where to get help with Git & GitHub (& in general)?
- On a terminal:
git <subcommand> --help\(\equiv\)git help <subcommand>, e.g.,git commit --help. - On the web:
- Git Documentation: https://git-scm.com/docs
- GitHub Documentation: https://docs.github.com/en
- StackOverflow: https://stackoverflow.com/questions/tagged/git
- ChatGPT: https://chat.openai.com/ ChatGPT is listed at the bottom, because it is not a reliable source of information. Always double-check any information you get from ChatGPT, especially when it comes to running commands on your computer. That said, it does usually point you in the right direction.
- Some repos to practice git:
- https://github.com/firstcontributions/first-contributions
- Tip: Create a repo on your GitHub account and play around with it.
Some notes on GitHub usage
- GitHub has a file size limit of 100 MiB per file, and of 1 GiB with Git Large File Storage.
- It has a file count limit of 300 updated files per commit, at 100 MiB per file for free accounts.
- To check other GitHub repo limitations, see this.
- Tip: Don’t store large monolithic files, like dataset archives, in your repo.
- Tip: Don’t store too many files, like images from extracted archives, or coding artifacts, like compiled binaries, in your repo.
- Tip: If you have to store very large files, up to 2 GB, you can use Git Large File Storage. It requires some additional configuration.
- Tip: GitHub also provides access to github.dev or vscode.dev, to view and edit your repos in the browser itself. Try pressing the . key while viewing your repo in the browser.
GitHub Pro for Students
- GitHub offers a free Pro account to students, as part of the GitHub Student Developer Pack. This gives you access to a bunch of useful features, like GitHub CoPilot and GitHub Codespaces.
- You can apply for the pack here. They ask for some proof of enrollment, e.g., a student ID card etc., that you submit each year. I strongly recommend applying for it. It barely takes 5 minutes.
- GitHub CoPilot is an AI pair programmer that helps you write code. Think of it like ChatGPT but with access to your codebase. So, you can ask it to comment your code, write test cases or to explain an error or a piece of code to you, among other things. You can read more about GitHub CoPilot here.
- GitHub Codespaces lets you run your code in the browser, without having to install anything else on your computer. It is similar to Google Colab, but for GitHub repos. You can also use it to collaborate with others on your codebase. You can read more about GitHub Codespaces here.
git config
git configlets you configure your git installation.git config --globallets you configure your git installation globally, i.e., for all repos on your computer. Without the--globalflag, the configuration is local, i.e., for the current repo only.git config user.name "<name>"sets your name for git commits (local repo).git config user.email "<email>"sets your email for git commits (local repo).git config core.editor "<editor>"sets your editor for git commits (local repo).git config --global credential.store "<helper>"sets your password / credential store for git.git config --global --listshows you the global git configuration.git config --listshows you the local git configuration.git config --get <item>shows you the value of the given item in the local git configuration, e.g.,git config --get remote.origin.url.
git submodule
git submodulelets you include another repo as a submodule in your repo.- This is useful when you want to reuse code from another repo, e.g., a library, a framework, etc.
git submodule add <url>adds the repo at the given URL as a submodule to your repo.git submodule update --init --recursiveupdates the submodules in your repo.git submodule foreach git pull origin mainpulls the latest changes from the remote repos to the submodule.
git <subcommand> --dry-run
git <subcommand> --dry-runis a dry run of a git command. It shows you what the command would do, without actually doing it.- For example,
git add --dry-runshows you all the files that would be added to the staging area, without actually adding them. - Note that
git --dry-runis not a git subcommand. It is an option that you can append to any git subcommand, e.g.,git add --dry-run. - Also, it is not a universal option. It is only available for some git subcommands, e.g.,
git add,git rm,git commit, etc. - Other subcommands have their own dry run analogues, e.g.,
git merge --no-commit --no-ff, etc.
References
- Thorough Git tutorial: https://www.atlassian.com/git/tutorials/setting-up-a-repository
- GitHub walkthrough: https://docs.github.com/en/get-started/quickstart/hello-world